
A lead generation website means a non-ecommerce website, where users take actions such as form submissions or button clicks, which don’t require the passing of dynamic variables, unlike in the case of online product purchases, for example, where the purchase value is a dynamic variable.
This guide will help you configure GA4 for your lead generation website via Google Tag Manager, so the first step is making sure you have Google Tag Manager already installed on your website.
Once you’ve checked that GTM is installed correctly on all of your website pages, the next step is creating the GA4 property, if you haven’t created one yet. If you already use Universal Analytics, there’s a good chance that Google has automatically already created one for you by now, so just look for it in your account.
Just like Universal Analytics, GA4 has a configuration tag that triggers the page_view and other default events, and should be installed on all website pages.
Set up the Configuration tag
1. Go to your Google Tag Manager account, click on Tags on the left menu and choose “New”.
2. Click on the Tag Configuration box and select Google Analytics: GA4 Configuration as a tag type.
3. Add the measurement ID in the box. To find your measurement ID, go to the Google Analytics 4 account, click on Admin from the bottom left and select Data Streams from under the Property settings. Select Web and click on the data stream showing for your website. In the next window you’ll see your measurement ID, which you can copy and paste in the GTM tag configuration.
4. Set the tag to fire on the trigger for All Pages.
5. Save and publish changes.
Now data will start flowing into your GA4 account and you’ll track the default events. However, if you want to track some specific actions (which you probably tracked before as Goals in Universal Analytics), there’s some more work to be done.
Form submissions
Let’s say you have one or multiple forms on your website and you want to track how many submissions you’re getting in GA4.
If your forms send users to a specific thank-you page URL upon submission – which is what we recommend – then follow the instructions below.
1. Go to your GA4 account, click Admin from the bottom left and select Events.
2. Click the “Create event” button and “Create” again, in the next window.
3. Give your event a name: you’ll see some predefined options once you click that box:

Select the one that’s most appropriate for your goal. For example, for a form submission you can select generate_lead; for a newsletter subscription you can select sign_up. Now, you can leave this event name as is if you only have one form to track on the website or all of the forms send users to the same thank-you page. If you have multiple forms with different landing pages, you should customize the event name in order to differentiate between the forms. For example, if the goal you’re setting up is for the Contact form submissions, then you should name the event as generate_lead_contact.
4. Next, you need to set up rules for this event to fire. If the specific form has a thank-you page, then you should add a rule for the page_location parameter to contain the URL string of that thank-you page. Here’s an example of how it should look:
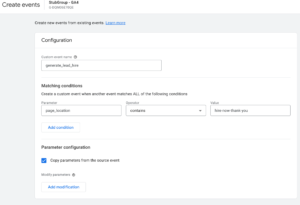
In this particular example, the thank-you page URL is https://domain.com/hire-now-thank-you.
5. Click Create.
6. Test with GTM preview and the DebugView mode in GA4 (from Configure) to make sure the events are firing correctly.
An important note: Even though you’ve created our custom event, it will not appear as an existing event until it is triggered. Once triggered, then you can mark it as a conversion by going to Admin – Events and switching the specific toggle on.
If your forms don’t have a thank-you page, there might be ways you can track their submissions in GA4 via GTM, by using the Form Submission trigger type or other trigger types, depending on the case.
Button clicks
Let’s say you want to track how many users click on a call (phone number) button on your website, for example.
In this case we’re proposing a solution via Google Tag Manager.
The first step for setting up a GTM tag is determining the action that should take place for the tag to fire, and pair that with a GTM trigger.
So, in the case of a button click, the best way to determine what trigger type you should be using in GTM is by inspecting the specific button on your website. To do this, right-click on your button and select Inspect.
In the window that’s opening at the bottom of your browser tab you should be able to see the code behind the button, and identify any click attributes such as Click URL, Click Class, Click Text etc. All of these are predefined variables in GTM which you can use to define a trigger.
Here’s how:
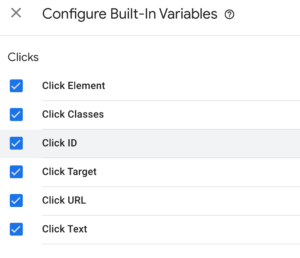
1. Go to Variables from the left side menu in the GTM Workspace.
2. Click on Configure, scroll down to the Clicks section and select all variables under this section:
3. Next, go to Triggers and click to add a new Trigger.
4. Select the Trigger type to be Click – All Elements.
5. Select the option for the trigger to fire on Some Clicks. And here is where you need to use what you’ve learned from inspecting the button on the website.
For example, if your button is a call button, its inspect module should show a link (a href=) such as tel:8881111111 (where 8881111111 is your phone number). In this case, you can use a condition based on Click URL with your trigger, and set it to include 8881111111.
Alternatively, if your button has a text on it, you can use Click Text and set it to equal to the text that is on the button.
6. Click Save.
So now you have the trigger your tag should fire on, and it’s time to move on to creating the tag.
1. Go to Tags and click to create a new Tag.
2. Select GA4 Event as a tag type. Then, select the configuration tag associated with it (which you already created at the beginning of this tutorial).
3. Then, you need to give the event a name – put something that’s suggestive to the action, for example “Call Button Click 8881111111”.
4. Under Event Parameters you can pass some additional information about this event.
For example, you could opt for button_name as the parameter name, and set it with a predefined value, by clicking on the + icon to the right of the Value field, and selecting Click Text (which is one of the predefined variables you configured earlier). This way, in case you have two call buttons on your website, one in the header and one in the footer, for example, and one of them has only the phone number itself as a text, whereas the other has a word added, like “Call (888) 111-1111”, you’d be capturing this difference via the button_name parameter.
5. Set the tag to fire on the previously created trigger, publish the changes and then preview and test, make sure the tag is firing correctly.
Just like we mentioned before, keep in mind that GA4 might take a while to start showing this event (probably 24 hours or so). You can look for it under Admin – Events. Once it shows there, you have the option to mark it as a conversion.
Having trouble setting up GA4 on your own? We’d love to discuss your unique situation!